How Many Dudes Rounds 21–60 Build Guide — Hacker Progression
Direct answer: the Act 1 Hacker–Construction core remained playable through Rounds 21–60 in this owner-recorded Tier 1 run, but it did not stay small. Hacker remained the damage commitment, Construction supplied the largest frontline block, Warlock added Pact pressure, and Explorer/Mutant covered recovery. The important mid-run lesson is to convert new capacity into conscious, role-relevant Dudes instead of treating a larger roster limit as power by itself.
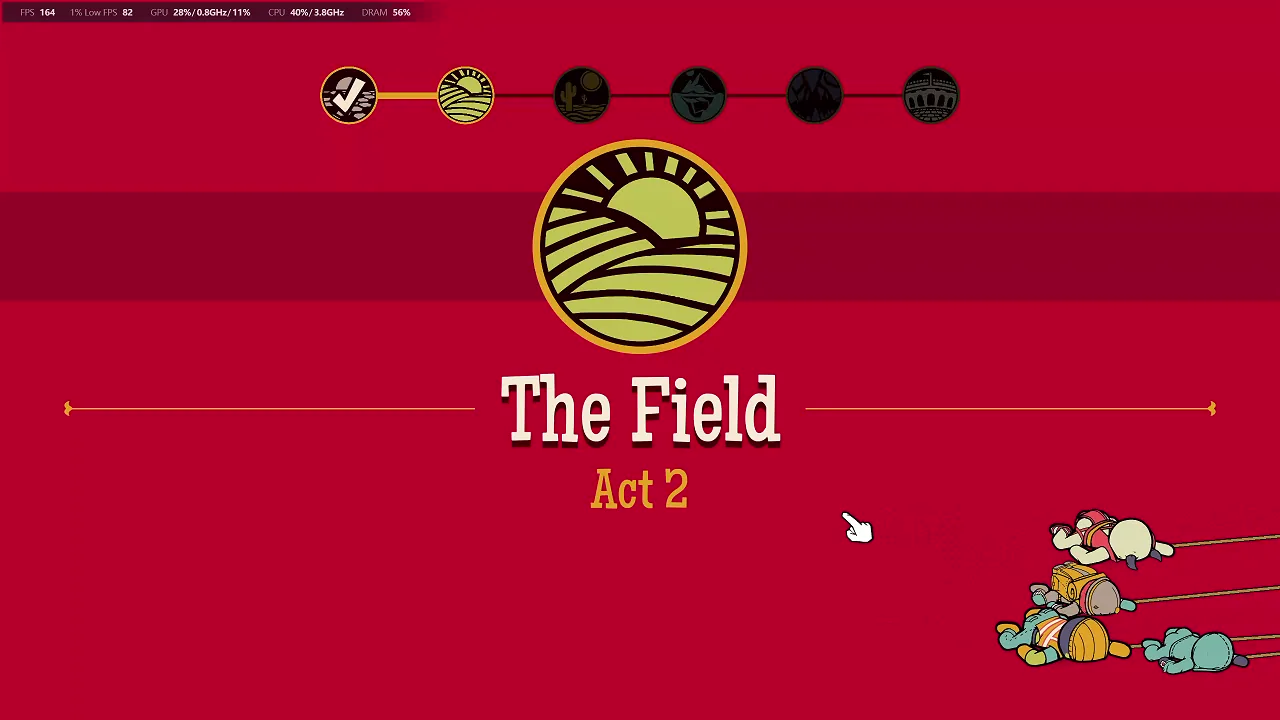
Start with the Rounds 1–20 route if you need the opening Flyers, Firewall, White Hat, Lunch Pail and early economy. This page begins at The Field, Act 2.
Route at a glance
Section titled “Route at a glance”| Segment | Recorded coverage | What the footage proves | What it does not prove |
|---|---|---|---|
| Act 2 — The Field | Rounds 21–40, 8:55 recording | Merchant, Dude Whisperer, Food Dude, Relic and Trinket offers; the run reaches the Round 40 reward flow | That every displayed offer was selected or universally optimal |
| Act 3 continuation | Rounds 41–60, 6:56 recording | Smuggler, training, shop and Round 60 combat/reward decisions | A fixed Act 3 recipe that ignores RNG |
| Later run evidence | Separate Act 5 segment, Rounds 81–94 | The same six-Type direction later reaches Round 94 and fails there | Continuous proof for Rounds 61–80 or a completed run |
What carried forward from Act 1
Section titled “What carried forward from Act 1”The run retained six Dude Types rather than opening a seventh:
- Hacker: the main capacity and damage commitment;
- Construction: the largest frontline and Taunt-capable body count;
- Warlock: Pact storage, Taunt and secondary damage;
- Explorer: low-health recovery through Canteen;
- Mutant: Floofball healing when active;
- Regular: cheap capacity and a pool that can later be retrained.
This is a wide roster. It gives the run several survival triggers, but it also produces more upgrade demands and more ways for active counts to fall behind capacity. The mid-run objective is therefore not “recruit everything.” It is to keep the core Types staffed while preserving cash, Dude Juice and a credible area-damage answer.
Act 2: Rounds 21–40
Section titled “Act 2: Rounds 21–40”Round 25: spend from a position of visibility
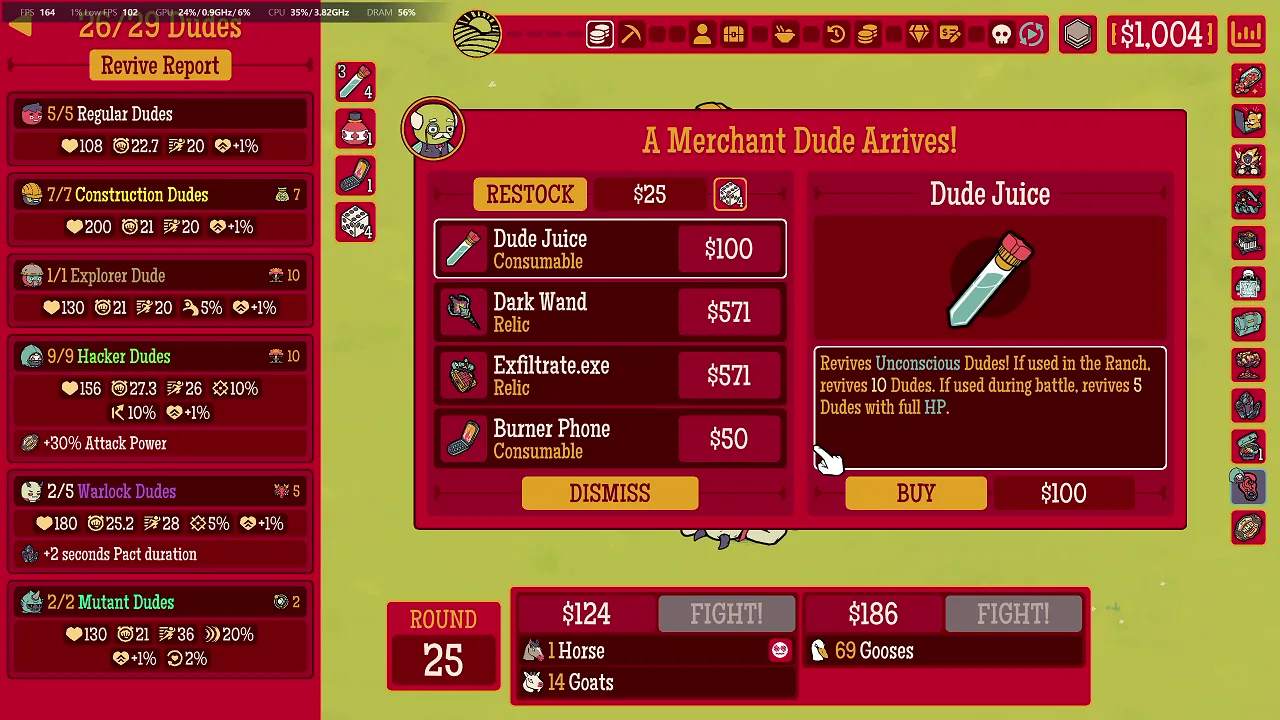
Section titled “Round 25: spend from a position of visibility”The Round 25 merchant screen records 26 of 29 Dudes available and $1,004 before a purchase. The roster panel shows five Regular, seven Construction, one Explorer, nine Hacker, two active Warlock out of five capacity, and two Mutants.
The shop offered Dude Juice for $100, Dark Wand and Exfiltrate.exe for $571 each, and Burner Phone for $50. This is a useful decision screen because it separates three jobs:
- Dude Juice restores an already-damaged roster.
- A Relic improves a Type or engine beyond this shop.
- A consumable buys one emergency intervention.
The screenshot does not prove which button was pressed. The safe rule is to buy recovery when missing bodies threaten the next fight; otherwise preserve cash for a Relic that strengthens a core Type rather than an incidental one.
Round 29: convert spare Regular Dudes deliberately
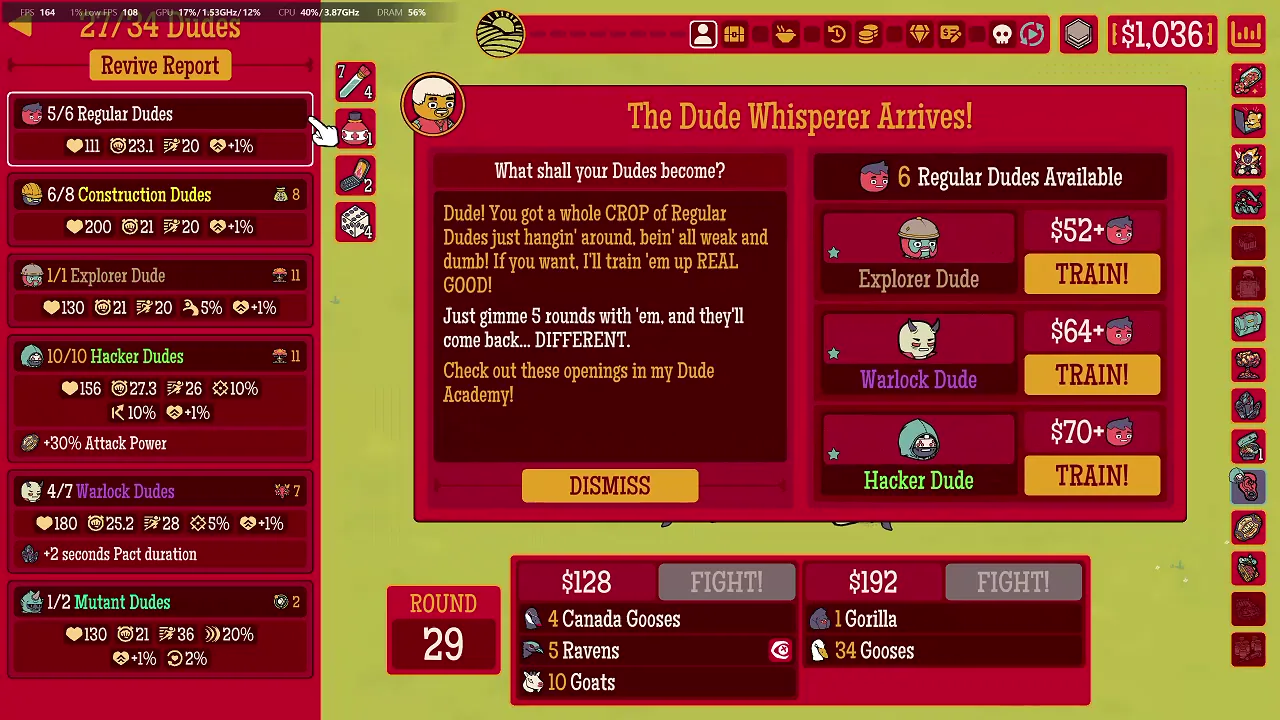
Section titled “Round 29: convert spare Regular Dudes deliberately”The Dude Whisperer offers to train six available Regular Dudes into Explorer, Warlock or Hacker. The UI says trained Dudes leave for five rounds and return different. That temporary absence matters: a conversion can improve the final composition while making the next few fights weaker.
For this route, the options map to three different problems:
- Explorer if low-health recovery is failing;
- Warlock if Pact pressure and Taunt coverage are too thin;
- Hacker if the team is surviving but lacks finishing damage.
The screen proves the choices and prices, not the selected class. Check the next five encounters before sending away a large share of the current Regular count.
Round 30: choose the failure mode, not the rarity label
Section titled “Round 30: choose the failure mode, not the rarity label”The Round 30 Relic Stash offers:
- Arsenal: 5% Crit Chance and 20% Crit Damage for all Dudes;
- Boombox: 30% Max HP and 20% Attack Speed for Construction;
- Rage Bait: a temporary 100% Cleave trigger after a Dude drops below 30% HP.
All three can fit something in the roster. Arsenal broadens damage, Boombox reinforces the existing tank block, and Rage Bait targets crowded fights. The footage records the offer but not a confirmed selection, so this page does not rewrite one of them as mandatory.
The Relics guide compares this stash with the recorded Round 50 and Round 60 offers.
Round 32: Food Dude is permanent run scaling
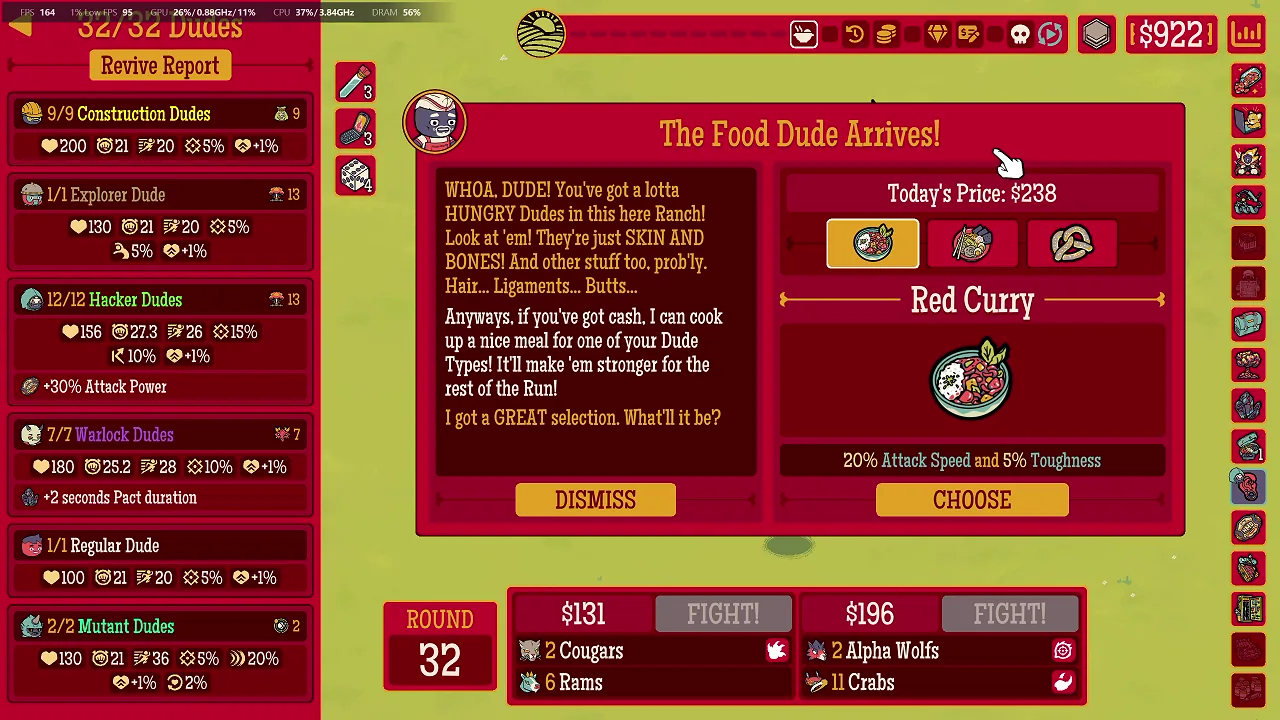
Section titled “Round 32: Food Dude is permanent run scaling”The Food Dude screen shows Red Curry for $238 with 20% Attack Speed and 5% Toughness. Food is not a one-fight consumable: the on-screen explanation says it strengthens one Dude Type for the rest of the run.
That makes the target more important than the dish name. A damage food on Hacker and a durability food on Construction solve different bottlenecks. The screenshot shows Red Curry as an option; it does not capture the final Type assignment.
Round 40: bind a Trinket to the next Act’s job
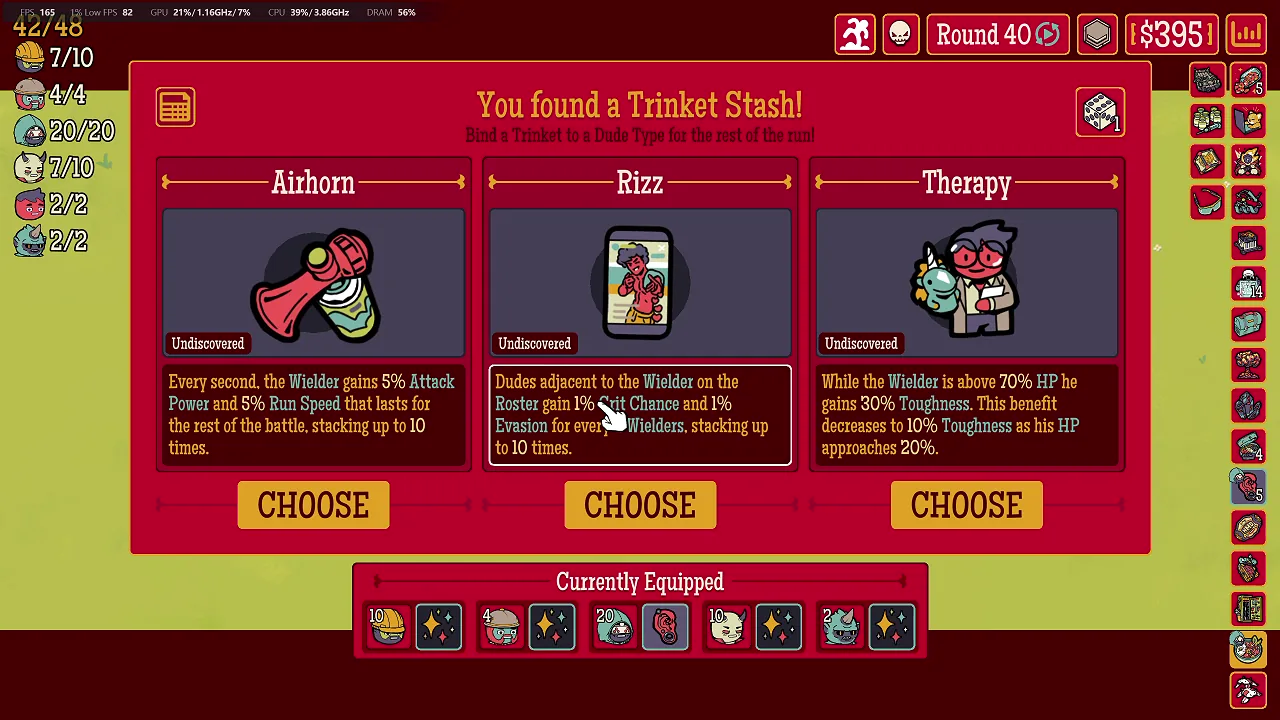
Section titled “Round 40: bind a Trinket to the next Act’s job”The Round 40 Trinket Stash offers Airhorn, Rizz and Therapy:
- Airhorn stacks Attack Power and Run Speed during battle;
- Rizz gives adjacent roster Dudes Crit Chance and Evasion per wielder;
- Therapy gives high-HP Toughness that decreases as the wielder approaches low HP.
The bottom row also records the previously equipped Type bindings. It is evidence of the decision state, not a confirmed new binding. Before choosing, decide whether the next Act needs ramping offense, formation synergy or prevention against initial burst.
Act 3: Rounds 41–60
Section titled “Act 3: Rounds 41–60”Round 42: use Smuggler only when ten rounds of delay are affordable
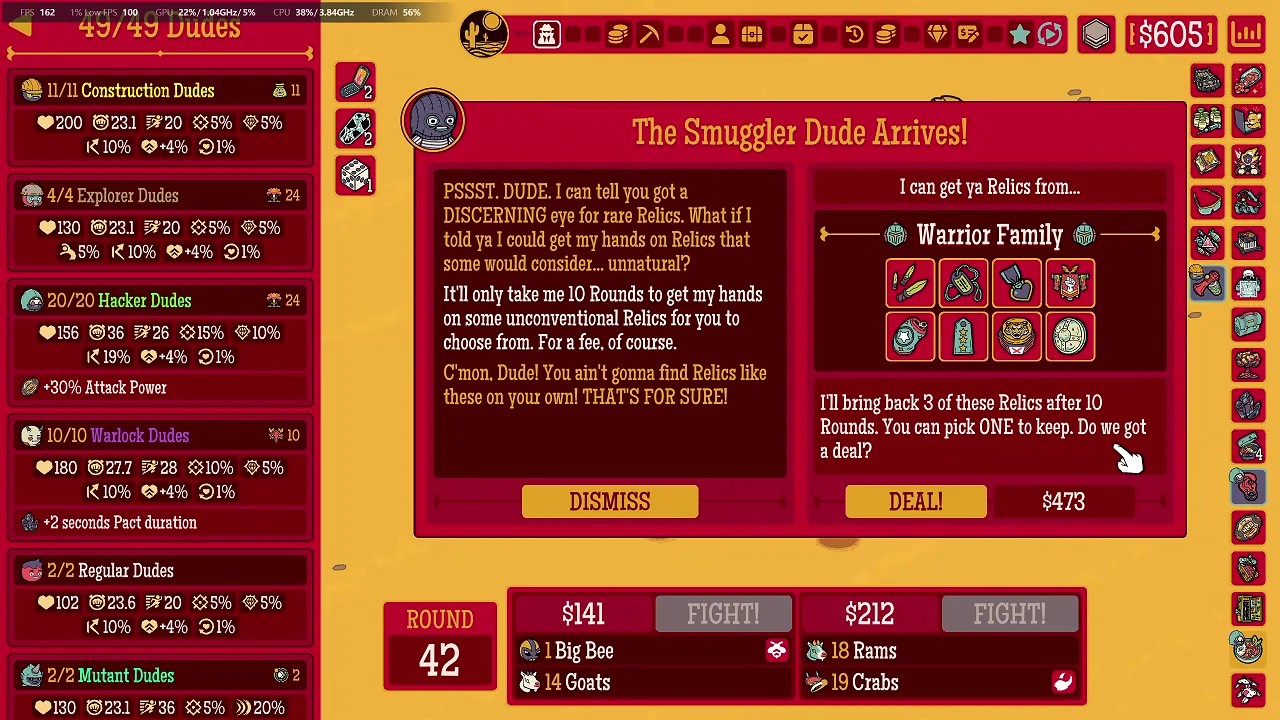
Section titled “Round 42: use Smuggler only when ten rounds of delay are affordable”At Round 42, the Smuggler offers three Warrior Family Relics after ten rounds for $473. The roster counter shows 49/49 Dudes at this screen. The deal can create access to an off-pool family package, but its value arrives later and the exact three offers are unknown until the return.
This is a timing decision, not free variety. Pay only when the current build can survive the wait and when several outcomes in the shown family would be useful.
Round 49: training capacity can create a temporary power dip
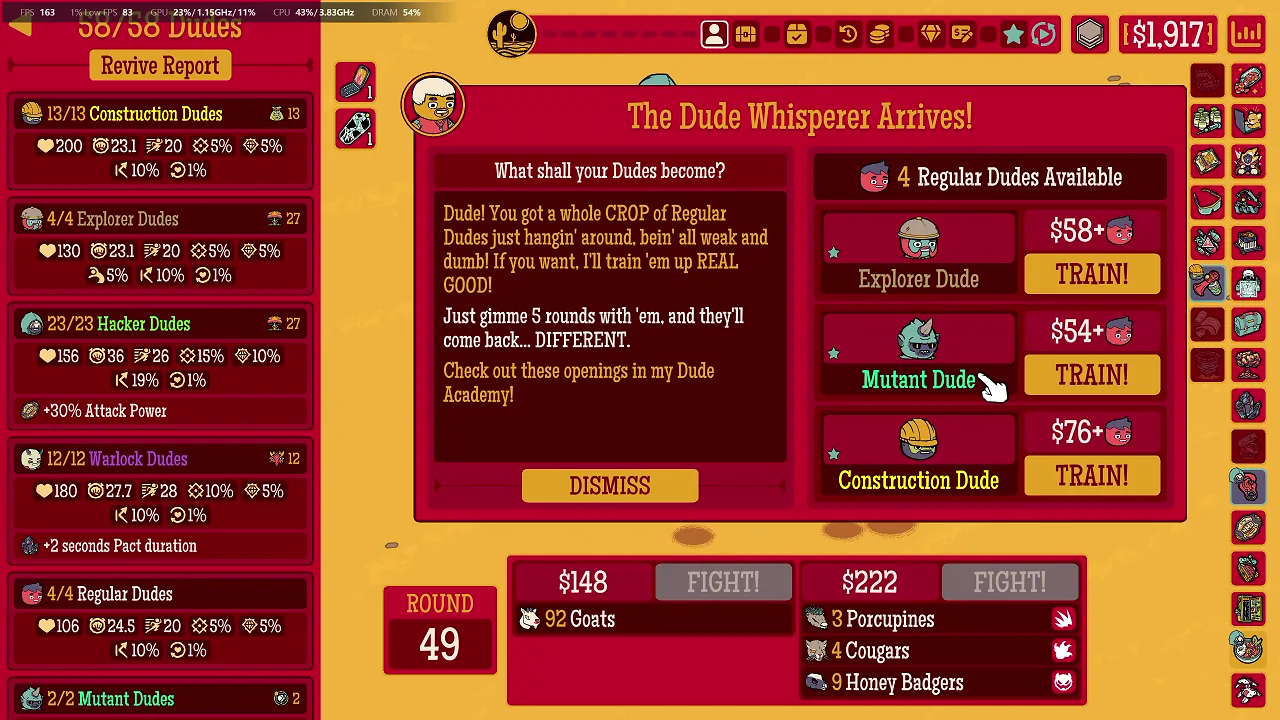
Section titled “Round 49: training capacity can create a temporary power dip”The second captured Dude Whisperer screen offers to convert four Regular Dudes into Explorer, Mutant or Construction for five rounds. The run is displaying 58/60 Dudes at the time.
This reinforces the same rule as Round 29: long-run roster quality and immediate active strength are different resources. Sending away four bodies before a dangerous modifier can be worse than accepting a less-perfect end composition.
Round 55: carry both recovery and an emergency damage button
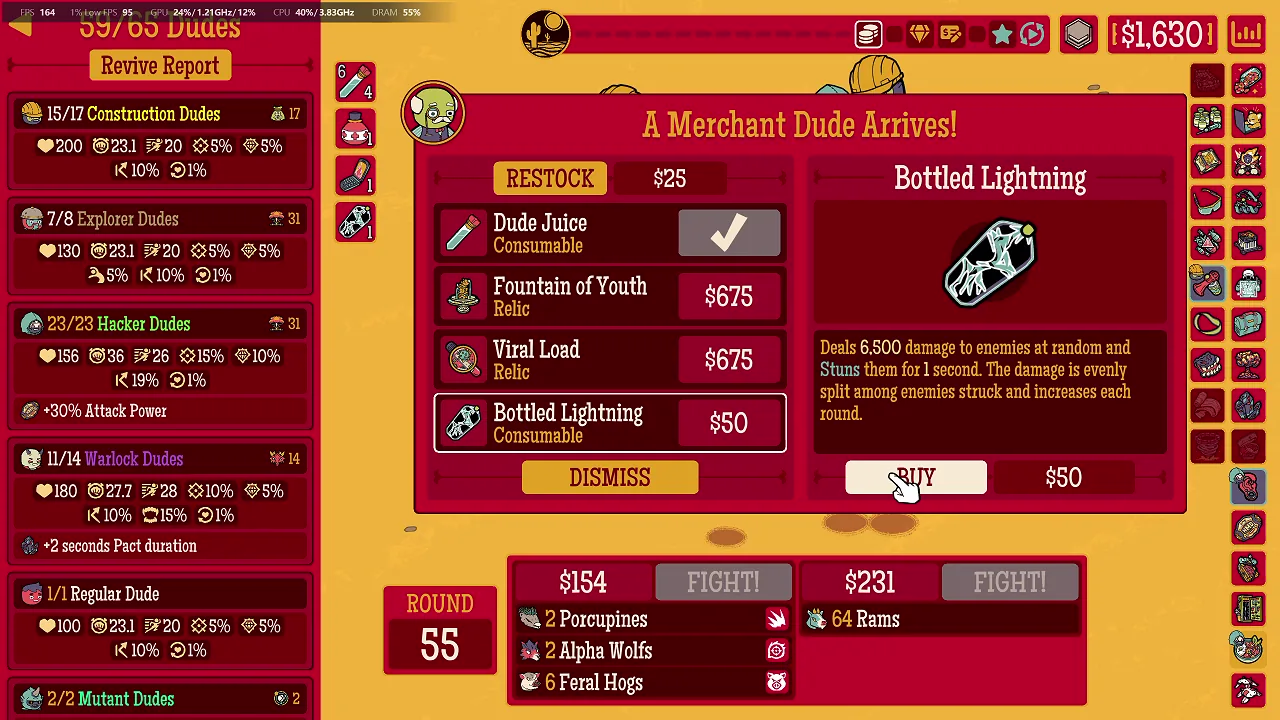
Section titled “Round 55: carry both recovery and an emergency damage button”The Round 55 merchant screen shows Dude Juice, Fountain of Youth, Viral Load and Bottled Lightning. Bottled Lightning’s captured text says it deals 6,500 damage split among random enemies, stuns for one second, and increases its damage each round.
The route keeps Dude Juice and Bottled Lightning for different failures:
- Dude Juice restores unconscious roster members;
- Bottled Lightning interrupts or damages a live enemy group;
- neither replaces enough conscious core Dudes entering the fight.
Round 60: consumables buy time, not a healthy roster
Section titled “Round 60: consumables buy time, not a healthy roster”During the captured Round 60 battle, Bottled Lightning displays 7,000 damage and a one-second stun. The short clip records the consumable sequence in context.
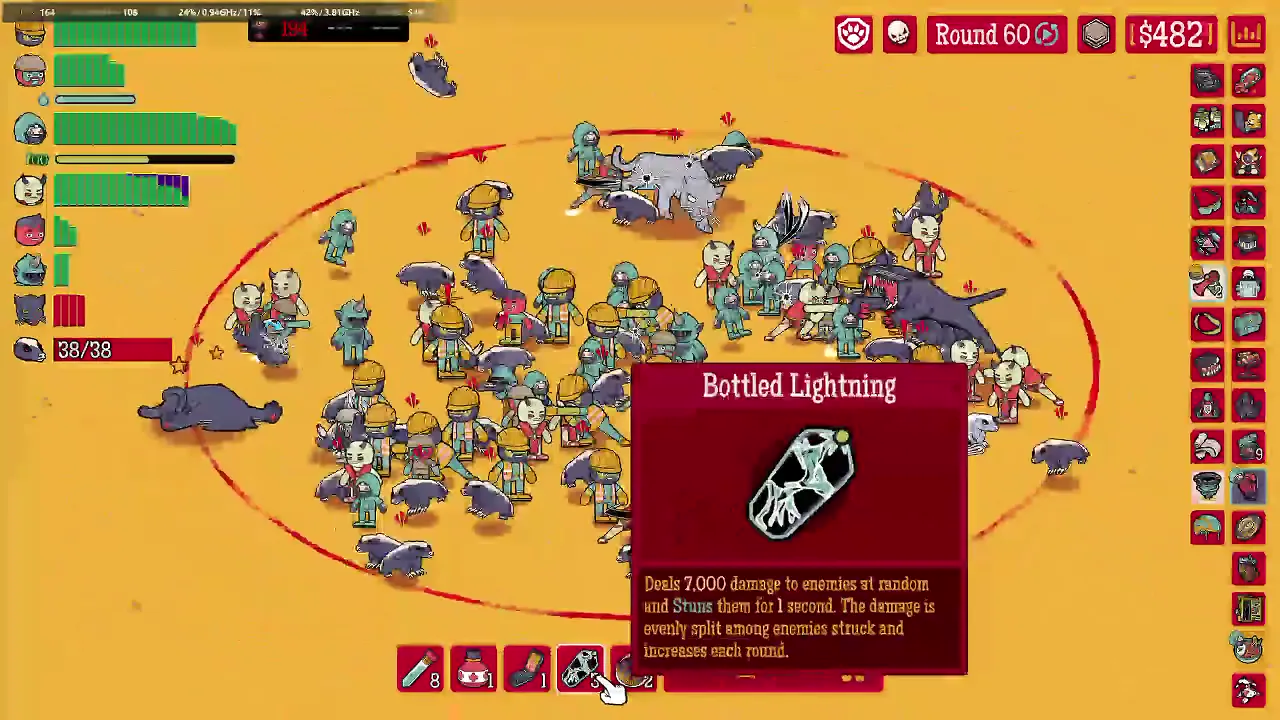
The post-fight Relic Stash then offers Ion Storm, Death Rattle and Bean Burrito. Ion Storm explicitly strengthens the Bottled Lightning line; Death Rattle scales Attack Power with unconscious Dudes, capped at 30%; Bean Burrito creates a knockout-triggered damage cloud. This is a good example of three offers that respond to different observed states. The recording does not show a final selection.
The scaling lesson from this run
Section titled “The scaling lesson from this run”The six-Type composition did not fail because one named Dude is universally weak. It became increasingly dependent on keeping the right proportions conscious:
| Captured point | UI Dude counter | Useful interpretation |
|---|---|---|
| Round 25 | 26/29 | Core roster mostly available; shop can improve rather than merely repair |
| Round 29 | 27/34 | Capacity is growing faster than the active group |
| Round 42 | 49/49 | Fully available roster at the Smuggler decision |
| Round 49 | 58/60 | Small active deficit before another training choice |
| Round 60 reward | 52/123 | A large displayed roster ceiling does not mean 123 battle-ready Dudes |
The counters are recorded UI states, not a monotonic capacity formula. Training, recovery and other run systems can change what the denominator represents at a moment. The actionable signal is the gap: a widening gap means the next purchase may need to restore active strength rather than add another future multiplier.
Safe continuation rules
Section titled “Safe continuation rules”- Keep Hacker as the damage commitment only while enough Hackers remain active to use the accumulated Relics and Type stats.
- Do not count unconscious Construction Dudes as frontline coverage.
- Use Dude Whisperer when the five-round absence is survivable.
- Treat Smuggler as a delayed, uncertain package—not a named-item shop.
- Compare Food and Trinket choices with the Type’s job for the next Act.
- Carry one recovery tool and one live-fight intervention when the economy permits.
- When the active/total gap becomes large, repair the roster before choosing a large swarm for marginal extra gold.
The last rule is not theoretical. The later supplied segment ends at Round 94 after entering with only 41 of 110 displayed Dudes. Read the Tier 1 Round 94 failure analysis for the exact pre-fight roster, enemy choice and result statistics.
Does this prove the build cleared Acts 2 and 3?
Section titled “Does this prove the build cleared Acts 2 and 3?”The uncut recordings reach the Round 40 and Round 60 reward flows, so they directly prove progression through those recorded segments. They do not establish a universal win rate or a complete Tier 1 clear.
Which Round 30 Relic was selected?
Section titled “Which Round 30 Relic was selected?”Unknown from the captured screen. Arsenal, Boombox and Rage Bait were offered, but the recording frame used here does not show the final click. The page preserves that distinction.
Is a 123-Dude counter at Round 60 automatically good?
Section titled “Is a 123-Dude counter at Round 60 automatically good?”No. The same captured screen shows only 52 in the first number. The run later demonstrates why future capacity and current fighting strength must be tracked separately.
Why not publish separate Act 2 and Act 3 pages?
Section titled “Why not publish separate Act 2 and Act 3 pages?”The search task and build are continuous, and the strongest value is the progression relationship. Splitting the same roster into thin Act shells would duplicate context and weaken the complete answer.
Sources and update triggers
Section titled “Sources and update triggers”- Firsthand source: site-owner PC gameplay recordings covering Rounds 21–60, reviewed 9 August 2026.
- Exact executable build: not recorded; mode is confirmed as Tier 1 by the later result screen.
- General build and Relic principles: developer Top 10 Tips for Newbie Dudes, checked 9 August 2026.
Recheck after changes to the named Dude Types, Relics, Trinkets, consumables, merchant/trainer timing or Act structure. A future complete rerun should preserve Rounds 61–80 and the final result screen.
Next steps
Section titled “Next steps”- Begin with the Act 1 Hacker–Construction route.
- Diagnose the later collapse in the Tier 1 Round 94 failure analysis.
- Compare the recorded offers in the Relics guide.
- Use the starter checklist before attempting another long run.
- Compare a different engine in the Lich and Thralls guide.